Thursday, March 29, 2012

jelly bean necklace


I was looking online for some fun Easter crafts to do over spring break. I am going to try this cute little edible jelly bean necklace this weekend with my daughter and some of her friends. It is such a cute idea!  I found the idea on familyfun.go.com:

I will post more pictures after the weekend of the ones my daughter and her friends made.

Wednesday, March 28, 2012

using tissue paper to make flowers

Yet another idea I got from pinterest.   Making flowers out of tissue paper.  In this piece of artwork my daughter drew some branches and then tore off small pieces of tissue paper, lightly dipped it in a bowl of glue, and stuck it on her branch.  So cute!

I am really using up this tissue paper I have.  Any other ways tissue paper can be used in art projects?

Tuesday, March 27, 2012

Fabric Flowers

Doesn't this look cute.  Read below to learn how to make one yourself!

My daughter loves when I make her things and loves flowers so after cutting some fabric for the cloth necklaces yesterday I cut out some circles of various sizes from the same piece of clothing.  As you can see from the picture I cut out six circles.

For this project you will also need:
fabric glue or needle with thread
buttons for the middle of the flower
candle

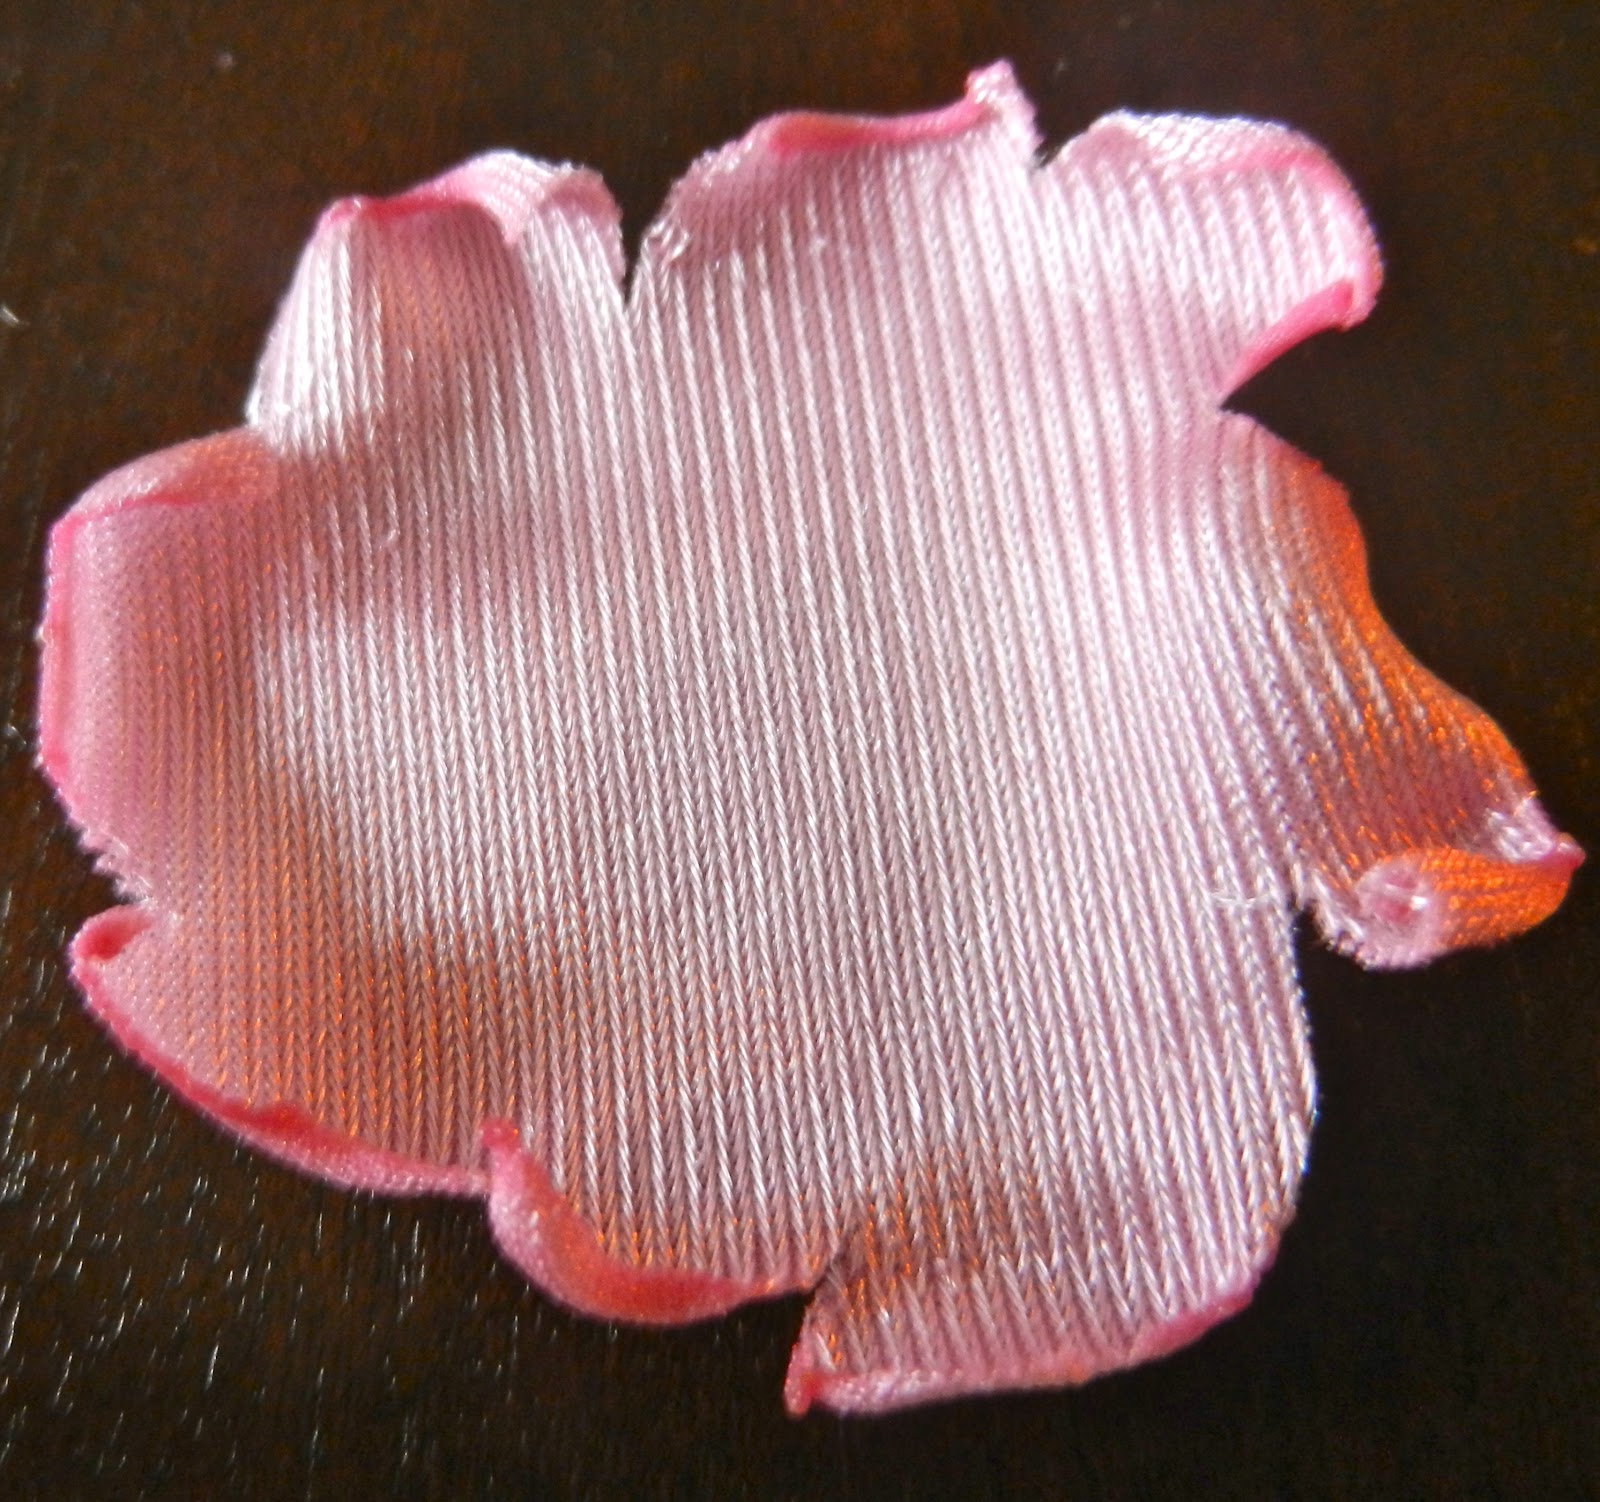
Then I cut little slits around each circle.  You don't have to do this but I thought it would look neat.
Using the candle, I held the fabric just over the flame.  The fabric created this curl like effect that was pretty neat.
This is what a few of the circles looked like laying on top of each other.  I had a few different buttons I placed in the center to see which one I liked the best before sewing it on.
I decided to sew this little flower onto a plain white t-shirt.  When I held the t-shirt up I noticed the fabric fell over, so I used the fabric glue to help keep the flower in place.  I think I may be a little scared to wash this.  Hope my daughter doesn't get it too dirty.

Monday, March 26, 2012

fabric necklace

I decided to try this after reading a post on a blog I follow.  I have some clothes my daughter grew out of so I cut one into three pieces and braided it into the above necklace.  I ended up giving it to my daughter and she just loves it.  Below is a close up of what the necklace looks like.
 You can also put on some beads to give the necklace some extra character.  Since this was my first time doing this I decided to start out just making the necklace and I liked the way it looked without the beads.


Sunday, March 25, 2012

Egg Yolk Paint

Since my daughter had a lot of fun with the cornstarch paint I made a few days ago, I decided to try out egg yolk paint.  This is a great paint that can be used in the bathtub.

materials needed:
egg
small bowl
water
spoon
fork
food coloring

1.  Crack the egg and put the yolk in the bowl.  Only the yolk.  Throw the egg white and egg shell away.
2.  Add about 8-10 drops of food coloring and a spoon full of water into the bowl. 
3.  Mix with a fork and add water until you achieve a paint-like consistency.
4.  Paint!

Saturday, March 24, 2012

making suds

This is a fun outdoor activity for kids and a science experiment all in one.

Materials needed:
Tall plastic cup or any other tall container
liquid dish detergent
1/2  cup warm water
1 tsp. Baking soda
Citric acid
Measuring cups

1. Mix three big squirts of the liquid dish detergent, 1/2 cup warm water, and one teaspoon of baking soda in the plastic container.  
2.  Sprinkle in couple pinches of the citric acid into the solution.  
3.  Watch the suds form.

note:  I bought my citric acid from amazon.com.  It's a rather large bag of it, but I do use it when I am making my own dishwasher detergent.

To integrate this into a science experiment discuss with the children what a base and an acid is.  The suds occur because the baking soda is a base and when you add the acid (citric acid), it produces carbonic acid.  The carbonic acid breaks down the water and carbon dioxide as a gas and the gas launches the bubbles.  Can you think of other household acid and bases?

Friday, March 23, 2012

Using plastic bottles to make prints

OK, so I got this idea from Pinterest.  I tried to go back and find it again but couldn't.  I guess I must not of pinned it or liked it.  Anyways, we used some different paints to do this: the cornstarch paint I made a few days ago and some finger paints I had laying around.

Here is some red paint I put in the bowl (I had just added some blue paint to make purple).  We dipped the plastic bottle into the paint to make the flowers.  Alex used her finger to paint the middle of the flower because the middle part didn't show up for her.
We made quite a few and had a lot of fun doing it.  Hope you get some cute ideas to do from reading this.

Thursday, March 22, 2012

making crayons

I have been accumulating broken crayons, knowing that someday I will melt them all together and make my own.  I used my mini muffin pan and filled the broken crayons up to near the top.  Then I baked them in the oven at about 200 degrees for about 10 minutes or so.  I would keep the oven light on so you can watch it.

Just a little hint, I can tell the different between Crayola crayons and the cheap crayons.  It seemed like the cheap crayons added a layer of oil.

Wednesday, March 21, 2012

Making Paint from Cornstarch

So, Alex used up her Crayola paint in the tub soap and wanted to keep the containers.  I have been thinking about what to do with them and decided to make some new paint out of cornstarch.
Materials needed:
White vinegar
Cornstarch
Water
Bowl
Spoon
Food coloring
Baby food jars or any other container that might work.

The first thing I did was put about 2 Tbs cornstarch, 2 Tbs white vinegar, and 2Tbs water and mixed them all together.  Then I divided up the mixture between the three little containers I was using.

Then I added in about 5-7 drops of food coloring into each jar and mixed it up.

Then I let my daughter come up with her own little creation.
Those dots all over the face.... those are freckles.  :)

Tuesday, March 20, 2012

nail polish that changes in the sun

Since my daughter had so much fun with the beads that changed color in the sun, I thought I would try out nail polish that changes color in the sun.  This nail polish starts out pink and changes to purple as soon as the sun hits it.
Purple is my daughter's favorite color!  She loved this and has bragged to her friends all about how her nails change color.


Monday, March 19, 2012

solar energy bead bracelet

My daughter made a solar energy bead bracelet this past weekend.  She thinks it's the coolest thing every!  She even drew a picture of this at school for her "Weekend News Update".  So cute!


For this simple bracelet I had my daughter put about 12 to 14 beads on a pipe cleaner.  Then I wrapped it around her wrist and cut off any excess.

As soon as she walked outside her bracelet changed colors.  This was probably one of the most exciting things that happened this past weekend.  It doesn't take much to keep her happy. :)

You can buy these cute beads on amazon.com.  I've provided the link below:


Sunday, March 18, 2012

making smores without the fire

This is a really cool summer idea and fun for the kids!

Materials Needed:
Paper
Aluminum Foil
Cup
Tape
Rocks
Graham crackers
Marshmallows
Chocolate

1.  Put about three to four rocks in a cup.  This keeps the cup from falling over in the sun.
2.  Place a piece of paper on top of a piece of aluminum foil.  The aluminum foil should be a little bigger than the piece of paper so you can fold over the sides.
3.  Wrap the paper/aluminum foil with the aluminum foil facing inward into a cone and tape the bottom so the cone stays in place.
4.  Place the graham cracker on the bottom, then the marshmallow, and the chocolate on top into the cone.
5.  Set in the sun, with the aluminum foil facing the sun.
6.  Watch the chocolate melt. 
7.  Place another graham cracker on top of the melted chocolate and enjoy!

Saturday, March 17, 2012

collage tree

I don't know about any of you, but I have so much stuff in my closet from when I used to like scrapbooking.  I also have tissue paper, stickers, admission tickets into historical parks, etc.  I decided to use some of it up with a collage.  This is an example of something my daughter and I worked on last night.  I don't know if you can tell, but it's a tree.  I drew a picture of the tree on paper before asking my daughter to use glue to glue the scraps of paper wherever she wanted.

Friday, March 16, 2012

Rock Buddies

As I have mentioned in a previous post, my daughter loves collecting rocks.   The last time we were out we decided to look for some smooth rocks.  When we got home we painted them, let them dry, then painted a face.  Then we glued on some cotton balls for hair.  To me the cotton balls make these guys look like old men, so I suppose you could paint the hair or use felt.  I would also suggest making the bug look like a rock.  My daughter loves playing with anything small, so now these little rock buddies are in the doll house with the pom pom spiders having a party.  :)

Thursday, March 15, 2012

Flower Hair Clip

I have seen many children (and adults) wearing big flower clips in their hair and just find them so adorable.  So I had to find a cheap and easy way to make them using glue (since I really am not good at sewing).  This was my first time doing this and I felt it was a little sloppy, but my daughter loves it so who really cares.  I also gave one to two of her friends and they love it too!  So this is what you will need:

Materials
Glue Gun
Glue sticks
Daisy or some other flower from craft store such as Michael's.
Hair clips (I like alligator clips)
Felt
Scissors

1.  Take the flower off of the stem.  These flowers can be easily detached from the stem.
2.  Cut out a circular piece of felt and glue it to the back of flower using glue gun.
3.  Glue the flower to the top part of the alligator clip.  I bought this package of 12 alligator clips at Ulta's for 2.49
4.  If you want you can glue another piece of felt over the area that is glued.  This is what I did because the glue was a little sloppy.
This is super cute!  I plan to make more and look up more ways to make cute little hair clips.  This is probably the easiest way, involving no sewing!


Wednesday, March 14, 2012

Drawing and Stamps

We have accumulated many stamps throughout the years and every now and then I get them out for Alex (my daughter) to use.  Sometimes she just stamps the paper with no particular order to the paper, but this last time my daughter drew a background picture (the ground and some grass) and then stamped some horses into the picture. Quick and easy fun!

Materials Needed:
Crayons, markers, or colored pencils
Stamps
Paper

There are so many great stamps out there.  I found these transportation stamps on amazon that could easily be used in a picture of a city, lake, or ocean.  I love Melissa and Doug products!


Tuesday, March 13, 2012

homemade fruit gummies

I like anything homemade.  And these are surprisingly good.  This is what you will need:

Materials:
Gelatine- You will need five envelopes.  So you may have to buy two boxes.
Candy Molds- It's better to use small molds.  Soap molds are are too big.
1/2 can of Frozen Juice concentrate- We tried to make our own juice and it didn't work out so well.  On our second batch we bought the frozen juice and it worked out perfectly.
1 tsp Agave Syrup- Don't be fooled by thinking the mixture is already sweet.  We did not add any sweetener to our first batch and it was not sweet at all.  I think this is due to all the gelatine in the recipe.  We added about 1 tsp. to the second recipe.  But then again, in the second recipe we used frozen juice concentrate so maybe the sweetener does not need to be used.

Heat the juice concentrate on low heat and stir in the gelatine.  When the gelatine has dissolved put spoon the gelatin into the candy molds.  Then cool in fridge or freezer for a few minutes.
This is what the finished product looks like.  My daughter loves them and brought them to school today for snack.  I suspect her friends will be jealous!


Sock Snowmen

These little snowmen are always a hit during the winter months.  This is what you will need to make these:

Materials:
Socks
Yarn
Googly eyes
Buttons
Fabric Glue
Dried beans
Rubber bands
Pom Poms
Marker

1.  If your sock has a colored heel cut the colored heel off and use that as the hat.
2.  Fill up the "body" portion of the snowman with dried beans then use a rubber band to keep the "body" portion separated from the "head" portion.
3.  Fill the "head" portion of the snowman up with more dried beans then tie the top of the sock with a rubber band. 
4.  Use yarn to tie in between the head and body as the scarf.
5.  Glue on googly eyes and button for the nose.
6.  Glue two to three buttons down the middle of the body for the jacket.
7.  Use a marker to draw the mouth.
8.  Use fabric glue to glue the heel of the sock or the hat onto the snowman.
9.  Finally glue a pom pom on top the hat.


Monday, March 12, 2012

Firefly

I just love this picture my daughter brought home from school!  She is such a beautiful and talented artist!

Sunday, March 11, 2012

Fun with Air Dry Clay

My daughter received clay from Santa this past Christmas and we have been using it off an on these past couple months.  Air dry clay is awesome because it is so easy to use and my daughter loves it!  All that is required is that you wait a few days for the clay to dry before painting it, which can be hard because little ones don't always have too much patience.
The first picture is a flower that I made and the second picture is a little snail that my daughter made.  I have found that the smaller and thinner the sculpture is the faster it will dry.  If you do something a little larger and thicker it may take an extra day or two.  We have made so many things out of this clay, from little bowls to sculptures.
We also discovered that the clay can be used as a crayon.  My daughter made what was supposed to be a worm.  After experimenting a bit she discovered she can color with it.  What a great idea!

Air dry clay is really inexpensive art and can be used for a variety of art projects.  Click the link below to check out some Air-dry clay from Amazon.


Saturday, March 10, 2012

Hand Bouquet

Making a bouquet by tracing the hand is an easy and personable touch to any gift or greeting card.  All you need is a few pieces of construction paper, a pencil, scissors, and tape.

First trace the hand a few times on some construction paper.  Your child can trace his or her own hand and then cut it.  Put the hand cut-outs together in a bouquet and tape together.

Friday, March 9, 2012

Pom Pom Spiders

Materials Needed:
Pom Poms- I used black but any color will do
Beads
Googly eyes
Glue
Pipe cleaners

The first thing we did was bend one pipe cleaner in the middle (the middle will be glued to the pom pom), then put a few beads onto each end.  Then we bent the pipe cleaner again on each side (for the legs).  You will bend the end of each pipe cleaner for the feet but you can do that when you are done so you can position the feet to help the spider stand. You can use two to three pipe cleaners for each spider.

Once you have a few pipe cleaners finished glue the middle section and googly eyes to the pom pom.  Let dry.

These are such cute little spiders!  My daughter has been playing with them in her doll house and is loving them!

Collecting

I mentioned in a previous post that my daughter is now collecting rocks.  If you live by a beach, like we used to, you or your child can collect shells.  This is one shell we found while out with my niece.  After collecting a bunch you can again sort them by size or color, paint them, use them as inspiration for a drawing, etc.  The ideas are endless.  My daughter likes to paint things, so she painted her rocks different colors.  :)

Thursday, March 8, 2012

Simply Painting

I love to encourage creativity.  I think one way to do this is to just give my daughter a blank sheet of paper instead of a coloring book.  This allows my daughter to do whatever she wants.  Here she decided to paint.  Other times she may use a pencil and draw animals, the family, her pet hamster, etc. 

Painted Rocks

I love pointing out beautiful things in the environment to my daughter.  One of the beautiful things I pointed out recently was how rocks really show their colors when they are wet.  So one morning we went out to the back porch and started looking at rocks and getting them wet.  To go a little further I had my daughter sort the rocks based on color.  Sorting by color, size, texture is a concept that should be worked on prior to kindergarten.  This is a fun, easy, cheap educational activity to do with any young child.   My daughter is now a avid rock collector.


New Blog

As many who know me know, I have had a family blog for a long long time.  I blog about everything on that blog: recipes, crafts, travel, my daughter losing her first tooth, etc.  This blog is going to be specific to crafts, mainly kid crafts, but also some other stuff too.  Hope you follow along.