Before my daughter was born, I used to knit more frequently. Mainly scarves and baby blankets for friends. My daughter is now 12 and it's been about that long since I last knit. For the last month, I have been trying to reteach myself with the help of a knitting book and some youtube videos. After casting on, knitting has been a little like riding a bike. My fingers just knew what to do.
I had to spend quite a bit of time working on making that first stitch and casting on. This was one of the videos I watched to help myself remember. I made a few small scarves for stuffed animals as practice.
After practicing casting on, binding off, and combining different stitches by making a blanket for a Littlest Pet Shop and three scarves for Build-a-Bears I decided to work on more advanced stitches.
This is where the basketweave stitch comes in. You can see part of my project above. I had some leftover pink yarn that I used and it turned out great.
To create a Basketweave:
Cast on 43 Stitches.
Row 1: Purl
Row 2: k3, *p5, k3; repeat after *
Row 3: p3, *k5, p3; repeat after *
Row 4: repeat Row 2
Row 5: Purl
Row 6: p4, *k3, p5; repeat after * but end last repeat p4
Row 7: k4, *p3, k5; repeat after * but end last repeat k4
Row 8: repeat Row 6
Repeat rows 1 through 8 (as many times as you want. If you repeat the rows 7 times you will have a square piece. You could repeat more for a scarf)
Knit row 1 - 4 and bind off on the Purl row, purling all stitches as you bind off.
Thursday, December 28, 2017
Friday, February 10, 2017
Taking the Goats for a walk
Willie is leading the pack as I take some of the goats out to where my neighbor delivered some hay. Willie is one of my favorite goats! When he was little I spent a lot of time with him because I had to bottle feed him. Now that he is grown he is so affectionate. He always comes to greet me and follows me everywhere.
Here is a little video I took today:
Thursday, February 9, 2017
Alex Acres: Lemongrass Sugar Scrub
Alex Acres: Lemongrass Sugar Scrub: Like I mentioned in an earlier post, Lemongrass is my favorite scent right now. I can't get enough of it!
I LOVE this scrub! It is made with a few ingredients which makes it quick and easy to make. As somone with dry skin, especially this time of year, the coconut oil used in this scrub leaves my skin soft when I get out of the shower.
I posted the recipe on my other blog: Alexacres.blogspot.com. Try it out! I'm sure you will love it!
I LOVE this scrub! It is made with a few ingredients which makes it quick and easy to make. As somone with dry skin, especially this time of year, the coconut oil used in this scrub leaves my skin soft when I get out of the shower.
I posted the recipe on my other blog: Alexacres.blogspot.com. Try it out! I'm sure you will love it!
Monday, July 8, 2013
finger puppets
After looking at library books about making finger puppets, I decided to come up with my own, kid-friendly way to make them. The books I found involved sewing and/or using a sewing machine. I wanted it to be simple and easy, so here goes:
materials needed:
felt pieces- any color- I used brown, black, pink, orange
scissors
glue gun
feathers, fur, tiny pom poms or any other items to decorate the finger puppets
The first step was cutting out the body. The top pictures is a simple template. I folded the bottom straight edge over and used the glue gun to glue it down. Then I glued the sides together, forming the body of the finger puppet.
On this puppet, I left the top open and put some white fur felt in the top. I meant to make a bunny, but it really turned out to be more like a monster. If you wanted you could put feathers or pipe cleaners in the top too. After putting in the fur, I glued the top together.
Then I used other felt colors to make the eyes, nose, bow tie, ears, etc.
materials needed:
felt pieces- any color- I used brown, black, pink, orange
scissors
glue gun
feathers, fur, tiny pom poms or any other items to decorate the finger puppets
The first step was cutting out the body. The top pictures is a simple template. I folded the bottom straight edge over and used the glue gun to glue it down. Then I glued the sides together, forming the body of the finger puppet.
On this puppet, I left the top open and put some white fur felt in the top. I meant to make a bunny, but it really turned out to be more like a monster. If you wanted you could put feathers or pipe cleaners in the top too. After putting in the fur, I glued the top together.
Then I used other felt colors to make the eyes, nose, bow tie, ears, etc.
mosaic using air-dry clay
We have been thinking of different ways we can use up our air dry clay. Since we have a bunch of beads we thought we would try a mosaic.
The first step was to use a rolling pin to roll out a piece of air-dry clay. My daughter used the ruler to make straight edges.
Then she used her beads and pressed them into the clay. FYI-- I thought we rolled our air-dry clay a little thin. If it were thicker, my daughter could press the beads into the clay a little deeper, therefore preventing the beads from falling off after the clay dries.
This is her very own creation (before the clay dried), a little kitty with a lot of stars in the sky. :)
The first step was to use a rolling pin to roll out a piece of air-dry clay. My daughter used the ruler to make straight edges.
Then she used her beads and pressed them into the clay. FYI-- I thought we rolled our air-dry clay a little thin. If it were thicker, my daughter could press the beads into the clay a little deeper, therefore preventing the beads from falling off after the clay dries.
This is her very own creation (before the clay dried), a little kitty with a lot of stars in the sky. :)
Friday, December 14, 2012
Weaving with construction paper
Since we have been in a construction paper crafty mood, I decided to show my daughter how to weave using construction paper. I saw an art teacher doing this with some of her students and thought this might be pretty easy for my first grade daughter to do. I showed her how to cut lines down the length of the paper and then cut strips from a different color piece of construction paper. She weaved them in and out, alternating the starting point. She had a little trouble with this, which I helped her with.
Snowman
My daughter and I have been using up some of our construction paper. Here is a cute little snowman my daughter made. It was really easy for her to do on her own. I made one first and showed her what to do and then she did it on her own.
Snowflakes
This is a such a fun and easy activity to do with any child. My daughter is now in first grade and is getting pretty good with the scissors. Here are a few of the snowflakes her and I made one day after school this past week.
Tuesday, October 2, 2012
More fun with toilet paper rolls
I got this idea off of pinterest! My daughter, who saves everything under the sun, had about a dozen of these toilet paper rolls saved up. So we decorated them with markers, but the ends off to make them tilt a little (I know it's hard to tell from this picture), glued the tubes to another piece of cardboard, let it dry, and then put some pencils in them.
I thought they turned out pretty cute! Of course not as nice as the posting I found on Pinterest.
Friday, August 24, 2012
paper plate dreamweaver
you will need:
paper plate with middle cut out
yarn and/or ribbon
glue or tape
stickers, markers, colored pencils to decorate dreamweaver
scissors
Construction paper
1. Cut out the middle of the paper plate and then little slits around the outside of the paper plates. The little slits are for the yarn.
2. Decorate the plate using whatever supplies you want.
3. Start wrapping the yarn around the plate putting the yarn through the little slits. Make sure to leave enough yarn at the top to tie a not so you can hang the dreamweaver on a doorknob or nail.
4. Tape some decorations to the end of ribbon and then tape the other end of the ribbon to the paper plate.
paper plate with middle cut out
yarn and/or ribbon
glue or tape
stickers, markers, colored pencils to decorate dreamweaver
scissors
Construction paper
1. Cut out the middle of the paper plate and then little slits around the outside of the paper plates. The little slits are for the yarn.
2. Decorate the plate using whatever supplies you want.
3. Start wrapping the yarn around the plate putting the yarn through the little slits. Make sure to leave enough yarn at the top to tie a not so you can hang the dreamweaver on a doorknob or nail.
4. Tape some decorations to the end of ribbon and then tape the other end of the ribbon to the paper plate.
Thursday, August 23, 2012
bottle cap spelling
items needed:
bottle caps
construction paper or old magazines
scissors
pen/pencil
After researching ideas to use with some of the bottle caps I have saved up I decided to use some of them to help my daughter with spelling and words.
Plastic Bottle Cap Art
I have recently started saving plastic bottle caps. I have seen some cute plastic bottle cap art around and thought it would be a fun activity for my daughter and I. Check out some of these cute ideas:
http://www.artgrange.com/michelleworkshop.html
http://inspirationgreen.com/art-from-bottle-tops.html
Not only can you make art, but you can use them to make game pieces or magnets!
http://www.artgrange.com/michelleworkshop.html
http://inspirationgreen.com/art-from-bottle-tops.html
Not only can you make art, but you can use them to make game pieces or magnets!
Friday, August 17, 2012
Washi Tape Pencils
Found this really cute idea to decorate pencils online:
http://pinkandgreenmama.blogspot.com/2012/08/back-to-school-supply-makeover-washi.html?utm_source=feedburner&utm_medium=feed&utm_campaign=Feed%3A+blogspot%2FHmTrN+%28Pink+and+Green+Mama%29&utm_content=Google+Reader
I haven't used Washi tape before, but I may have to get some and try this out! My daughter loves art projects and this seems simple and fun!
http://pinkandgreenmama.blogspot.com/2012/08/back-to-school-supply-makeover-washi.html?utm_source=feedburner&utm_medium=feed&utm_campaign=Feed%3A+blogspot%2FHmTrN+%28Pink+and+Green+Mama%29&utm_content=Google+Reader
I haven't used Washi tape before, but I may have to get some and try this out! My daughter loves art projects and this seems simple and fun!
Monday, August 13, 2012
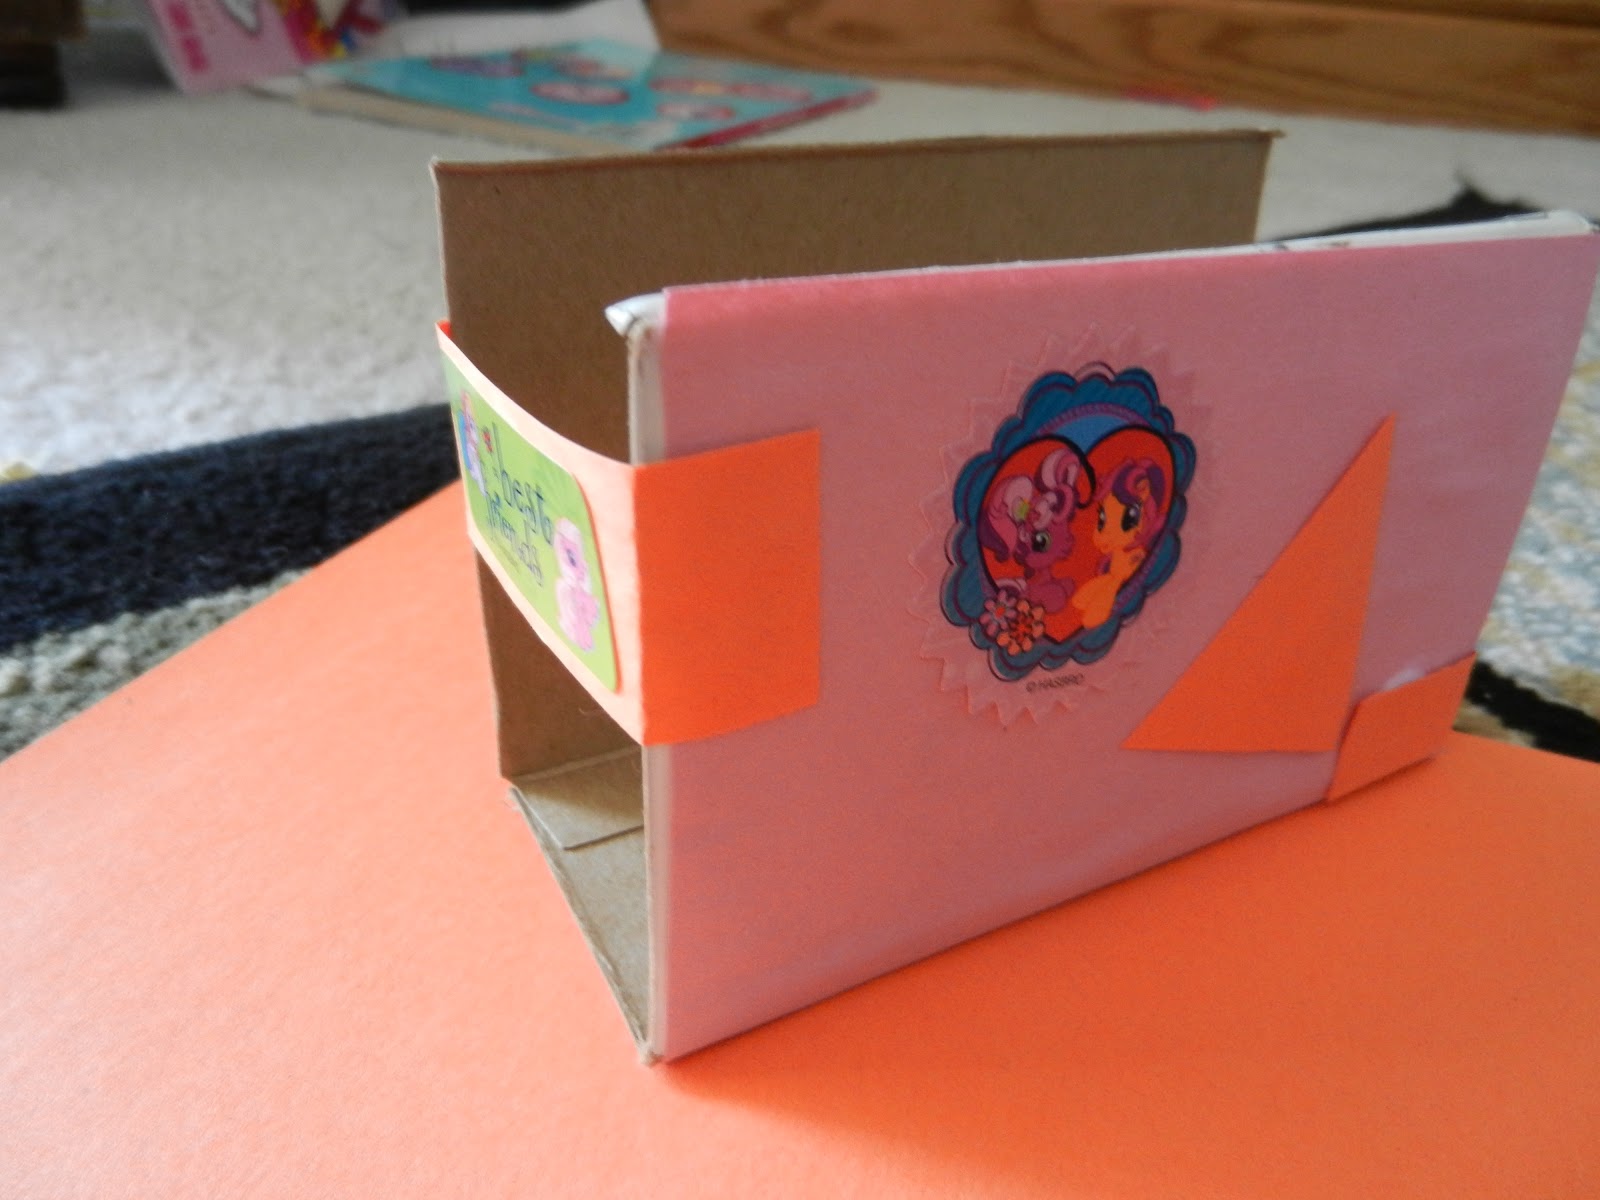
Napkin holder made from mini cereal box
We have been trying to figure out what to do with all these cereal boxes that my daughter, Alex, has been saving for art projects. I really do hope she does not turn out to be a hoarder, because now she does not want to throw away anything in hopes to save items for future art projects. So today we decided to make little napkin holders.
The first step was to cut the box sides leaving one side together, the bottom, as pictured above.
Then we used construction paper and stickers to decorate the box. You can see I added a little strip of paper to the end of the box to hold it together. It worked out OK but I think I need to figure out a different way to keep the box together so the napkins can hang out both ends.
The first step was to cut the box sides leaving one side together, the bottom, as pictured above.
Then we used construction paper and stickers to decorate the box. You can see I added a little strip of paper to the end of the box to hold it together. It worked out OK but I think I need to figure out a different way to keep the box together so the napkins can hang out both ends.
making pictures with rocks
I don't know about your kids, but mine love to collect things, especially rocks. One thing that is fun is having them collect rocks and have them organize them by color, then have them arrange them in a picture or collage. This is a little flower put together by dark gray and yellowish rocks.
Sunday, August 12, 2012
My first diaper cake
So I decided to tackle my first diaper cake (pictured above). There are a few things I did that I would do differently. First of all, I used the newborn diapers and quickly realized they are too small. So in the future I would use a size or two bigger. You will need:
Diapers (Not the newborn size)
rubber bands or those thin plastic hair ties
bottle (or anything else for the top of the cake)
Ribbon
Tape or glue
Bowl (or something similar that you can wrap the diapers around) You will need at least two, one bigger then the other.
Any other decorative item (stuffed animals, flowers, etc)
Yarn
First thing you should do after you have all your supplies is start rolling the diapers wrapping the rubber bands around them. I did mine the night before when I had some friends over. This made the project quick and easy the next day. Then use a bowl turned upside down and start setting the diapers around it. After one set of diapers are set around the bowl use yarn or something similar to keep them in place. Then start with another row of diapers and do the same thing. You can do as many rows as you like but at least do two or three. Wrap the outer edge with a cute ribbon and fasten it with glue or tape (I used hot glue).
Set the second bowl on top of the bottom tier and do the same process as described above. Then for the top tier use the bottle and wrap the diapers around the bottles. I used some stuffed animals to decorate the cake too. Super cute and my friends loved it!
Diapers (Not the newborn size)
rubber bands or those thin plastic hair ties
bottle (or anything else for the top of the cake)
Ribbon
Tape or glue
Bowl (or something similar that you can wrap the diapers around) You will need at least two, one bigger then the other.
Any other decorative item (stuffed animals, flowers, etc)
Yarn
First thing you should do after you have all your supplies is start rolling the diapers wrapping the rubber bands around them. I did mine the night before when I had some friends over. This made the project quick and easy the next day. Then use a bowl turned upside down and start setting the diapers around it. After one set of diapers are set around the bowl use yarn or something similar to keep them in place. Then start with another row of diapers and do the same thing. You can do as many rows as you like but at least do two or three. Wrap the outer edge with a cute ribbon and fasten it with glue or tape (I used hot glue).
Set the second bowl on top of the bottom tier and do the same process as described above. Then for the top tier use the bottle and wrap the diapers around the bottles. I used some stuffed animals to decorate the cake too. Super cute and my friends loved it!
Friday, August 3, 2012
Pop Tab Bracelets
I have never made these before but they look easy and fun. Check out this video I found while I was surfing around youtube for some new craft ideas:
Wednesday, August 1, 2012
Making a fan
I never thought my daughter would have so much fun with something so simple. I taught her how to make a fan the other day and now she is decorating paper and folding it into a fan. This could be a beginner paper craft project for any child.
Tuesday, July 31, 2012
Pizza Collage
To make the pizza collage you only need glue, construction paper, and scissors.
She used the brown for the crust, then glued on the red for the tomato sauce. White for onions, brown for mushrooms, black for black olives, yellow for cheese, etc.
Just cut out your pieces and glue them all together! My daughter had so much fun with this!
Monday, July 30, 2012
Painted Lady Butterfly Kits
A few weeks ago I bought a butterfly kit for my daughter. A few of her friends have had them, so she really wanted one. Plus it's a great way to teach and show her the process of metamorphosis.
I bought the Insect Lore Butterfly garden and then sent in for the caterpillars. They arrived in the mail in less than a weeks time.
My daughter checked the caterpillars everyday and was so excited to see them change into chrysalids. We really wanted to keep them around as pets for a few days but my husband thought it would be better to let them go. :(
I bought the Insect Lore Butterfly garden and then sent in for the caterpillars. They arrived in the mail in less than a weeks time.
My daughter checked the caterpillars everyday and was so excited to see them change into chrysalids. We really wanted to keep them around as pets for a few days but my husband thought it would be better to let them go. :(
Subscribe to:
Posts (Atom)